
Adalogical Ænigma #17Hints on Solving the ÆnigmaGracious greetings, gentle patron!
If you are reading this page, then I fear you may have ceased making progress on my seventeenth ænigma and are perhaps on the verge of declaring defeat. I must encourage you, in the strongest possible terms, not to yield to despair, but rather to take heart and allow me to give you a small hint or two. It may be, with just a modicum of my assistance, that you will soon be taking my ænigma by storm!
Regrettably, I cannot with certainty predict, as I pen these words, exactly how far into the solution you have yet traveled. If you have not yet made any progress whatsoever, then I suggest you try reading through my detailed walk-through of the example puzzle; it should provide you with some guidance and commonly used solving techniques.
Otherwise, I think it likely that you will have discovered between four and seven squares to which you have confidently assigned digits. Specifically, using only the techniques illustrated in the example puzzle, you will most likely have filled in one digit in the left-most of the five sub-grids, between one and three digits in the centre sub-grid, and at least one digit in the lower-right sub-grid. Moving beyond this point, however, requires a substantially new form of deduction.
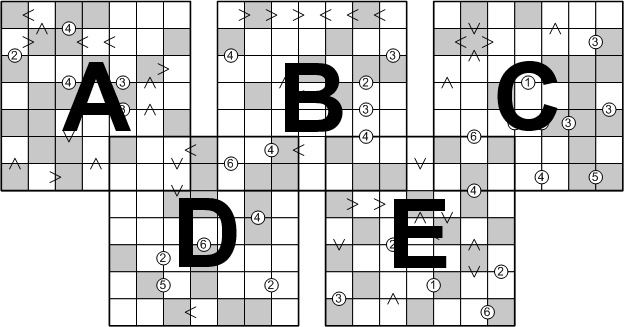
For convenience in what follows, let us agree to employ concise names for the five sub-grids, as laid-out below:
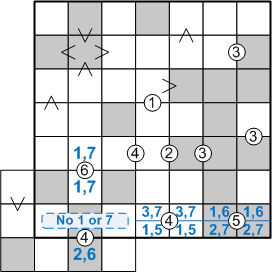
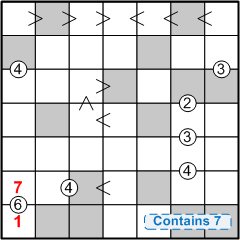
We will focus our attentions initially on sub-grid C, the vicinity of which looks as follows:
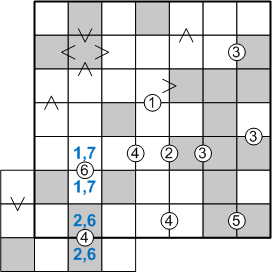
I've written in blue here some information that I assume you will already have divined, viz., that the indicated squares must each contain one of the two digits therein inscribed. If these azure assumptions are coming as a surprise to you, I must advise that you abandon this hint for now, returning once you have, as mentioned above, determined with certainty the placements of at least five digits across the entire diagram.
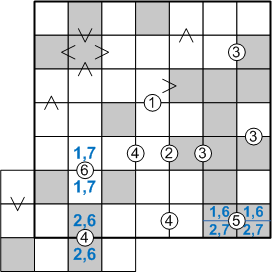
Let us direct our gaze to the lower-right corner of this sub-grid, specifically on the two rightmost squares in the bottom row, the ones sharing the circled-five clue. If we ask ourselves, "what digits might legally be placed in these squares," a moment's reflection quickly reveals but two possibilities: these squares must contain either a 1 and a 6 (in some as-yet unknown order) or else a 2 and a 7 (again, in some order). The following illustration captures this analysis:
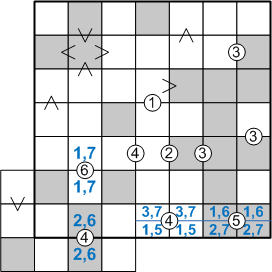
Let us now consider these two cases one-by-one. In particular, let us consider, for each case, how we might be able to assign numbers to the next two squares to the left, the ones sharing the circled-four clue. In the first case, when the circled-five squares hold a 1 and a 6, how could we fill in the circled-four squares? Clearly, they can only be a 3 and a 7 (in some order). Similarly, in the second case, when the circled-five squares contain a 2 and a 7, there is only one possibility for the circled-four squares: they must be a 1 and a 5 (again, in some order). Adding these new insights to our diagram yields the following picture:
At present, we have no way of choosing between these two cases, and thus it may seem that our analysis has achieved nothing of use, but that is not so. Since these are the only two possible cases, any properties that are true in both cases must be true always. In the first case, shewn above the blue line, these four squares contain the digits 1, 3, 6, and 7 (in some order). In the second case, they contain 1, 2, 5, and 7 (again, in some order). In both cases, somewhere in these four squares exists a 1 and a 7. That means that the other three squares in that row of the sub-grid do not contain either a 1 or a 7:
Having gained this modicum of certainty, let us now shift our focus leftward, onto sub-grid E. Including our new knowledge, that sub-grid appears as follows:
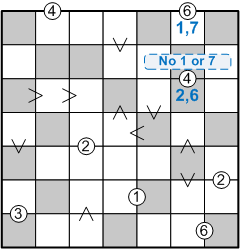
Maintaining our focus on the same line of squares, now the second row of this sub-grid, what can we say about the positions of the 1 and the 7? The 1 could, so far as we yet know, appear in any of the leftmost four squares. The 7, however, cannot be placed in the centre square of this row, since its digit must be strictly less than that of the square above it; thus, the 7 must be contained in one of the three leftmost squares:
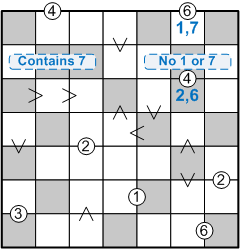
Once again, we shift our focus leftward, onto sub-grid B, which now appears as follows (once more including, on the far left, some insights I assume you had already gleaned):
Now that we have brought together information both fore-known and newly learnt, we may finally see the payoff for our labours. Since the 7 in the bottom row must appear in one of the rightmost three squares, it cannot appear in the leftmost square. We know that that leftmost square must be either a 1 or a 7, and it cannot be the latter, so it must be the former! Of course, that also determines the contents of the square above it:
Let us review what has transpired: working in one sub-grid, we pried loose an atom of information. That information had an impact on some nearby squares that were shared with a different sub-grid. Refocusing on that sub-grid led us to more information there. Carrying the pattern of cross-sub-grid information transfer through another iteration, we were finally rewarded with solid, productive insights.
Now, I pray that you try returning to your ænigma paper, to see if this reasoning does not allow you to make substantial further progress on your own. (Indeed, this style of inference will come in handy on a number of occasions in the remainder of the ænigma, so you would be well advised to keep a wary eye out for its possible use.)
Please hold in your awareness the certain knowledge that this particular one of my ænigmas is extra-ordinarily difficult. It is entirely to be expected that your march toward its solution will proceed in fits and starts, with significant pauses on several occasions as you search out the next available deduction. I hope that I may rely on you to persevere, never losing hope: the individual deductions are all relatively straightforward, but they are, from time to time, quite well hidden among the visible complexities of the overall diagram. A little patience will surely suffice to force each such stepping-stone to reveal itself to you.
Gentle patron, remember: I sincerely believe in your ability to succeed!

|
Shopping Cart |